Firmware Updates
The Web3 Pi UPS contains three microcontrollers, and two of them can be updated by you — remotely from the web panel, or locally from a browser over USB. Firmware versions use the form <chip>:<version>, e.g. esp32:0.8.6.
| Chip | Role | How it updates |
|---|---|---|
| ESP32 | LTE-M modem module (the M.2 card) | Over the air from the panel, or over USB via the Workbench |
| RP2040 | UPS controller — display, buttons, telemetry, host link | Over the air from the panel (relayed internally), or over USB via the Workbench |
| CH32X | Power path — PD negotiation, charging, failover | Not user-updatable — it ships final, so power delivery never depends on an update |
Firmware images are published by the Web3 Pi team. For panel updates the current images are already in the panel's image list; for USB flashing the image files come from the open firmware repository.
Checking Your Firmware Version
- Web panel — the device header shows the ESP32 version next to the ICCID, and Settings → Firmware (ESP32) shows it too. It refreshes each time the module connects, so about a minute after power-on. The panel shows the ESP32 version only.
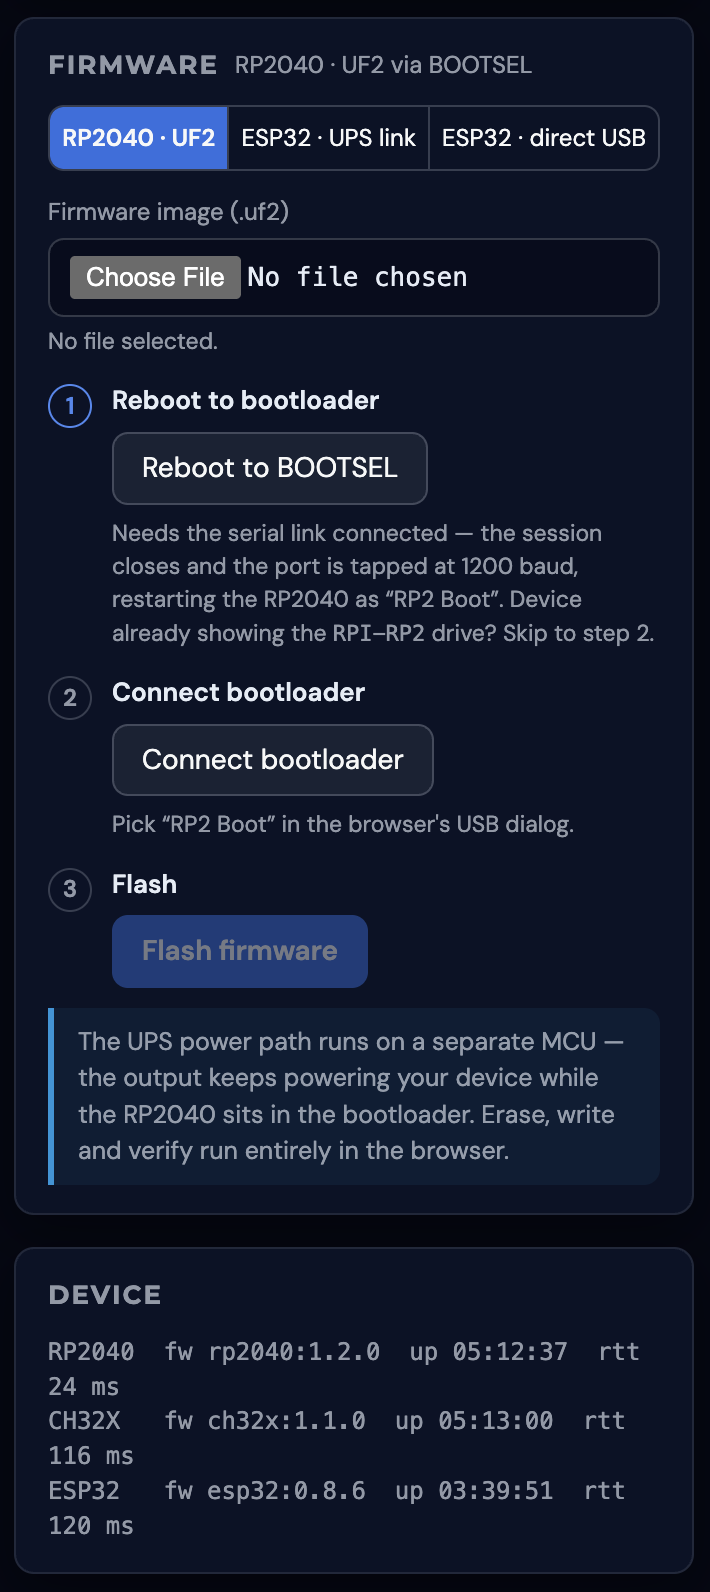
- Workbench — connect the UPS over USB (below) and the Device card lists all three chips with their exact versions, within seconds.
Updating from the Web Panel (over LTE)
Units with the LTE-M module update over the air — no cables, no ladder to the shelf the UPS sits on.
- Open your device in the panel and go to the Commands tab → Firmware update card.
- Pick the Target MCU — ESP32 (modem) or RP2040 (UPS controller) — and an image (the newest is preselected).
- Click Send update and confirm. The device downloads the image over LTE and applies it; the panel's success message points you to the Events tab, where progress arrives as
fw_updateevents (started → progress → verifying → rebooting, plus a finaldonefor RP2040 updates — an ESP32 update ends atrebootingand then simply reconnects on the new version).
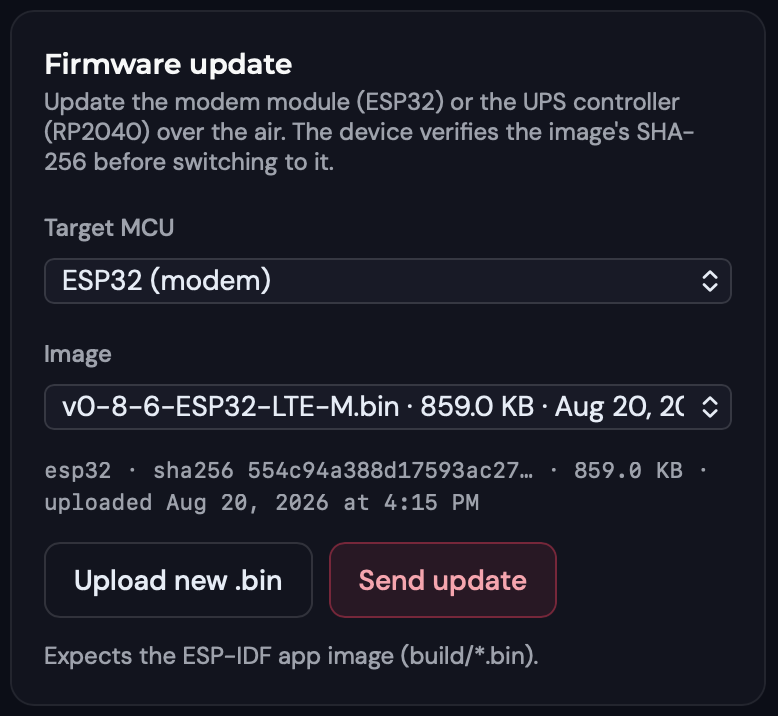
What to expect:
- It takes a while. The download runs at cellular IoT speeds — expect roughly 10 minutes for an ESP32 image, less for the smaller RP2040 image. "Stuck at 25 %" for a few minutes is normal.
- The Pi never loses power. An ESP32 update reboots only the modem module (telemetry pauses a minute or two). An RP2040 update shows a FW UPDATE progress screen on the OLED (buttons disabled), then the controller reboots with its startup melody — the power path is handled by the CH32X and stays up throughout.
- It is rollback-safe. Every image is SHA-256-verified before it is applied, and the previous firmware is kept: if the new ESP32 image cannot get back online within 10 minutes — or the new RP2040 image misbehaves — the device automatically returns to the old version. A failed update therefore looks like "device came back on the old version": retry with good signal.
- Confirming it took: for ESP32, the version in the panel header/Settings updates after the module reconnects; for RP2040, look for the
fw_update.doneevent.
Mode matters
Panel updates work in MQTT mode and in Arkiv mode. The walkthrough above describes MQTT; in Arkiv mode the card is titled Firmware update (OTA over LTE) with a Sign & update button (one owner-wallet signature, like any Arkiv command), it requires device firmware esp32:0.8.2 or newer, and no progress events appear on the Events tab — confirm success by the version bump instead. In HTTP mode there are no panel updates — switch the device to MQTT from the OLED menu for the update, or flash it over USB.
During an update
Keep the unit powered, send one update at a time, and don't switch backend modes mid-update. Each attempt downloads the full image (~1 MB for ESP32) from the SIM's metered data plan.
Local Updates over USB (Workbench)
workbench.web3pi.io is a browser tool for the UPS — live telemetry, commands, and firmware flashing with nothing to install. It runs in desktop Chrome, Edge, Firefox 151+, or Opera (Safari and mobile browsers are not supported); the RP2040 flashing step specifically needs a Chromium browser (Chrome/Edge/Opera), while Firefox can do everything else, including both ESP32 flashing modes.
Connect: run a USB-C cable from the UPS OUT port to your computer. The UPS keeps powering your laptop while handing it the data link, and shows up as Web3_Pi_UPS (on macOS, click Allow on the accessory prompt). Click Connect on the page and pick the device. Only one program can hold the serial link — close any ups-live or terminal session first.
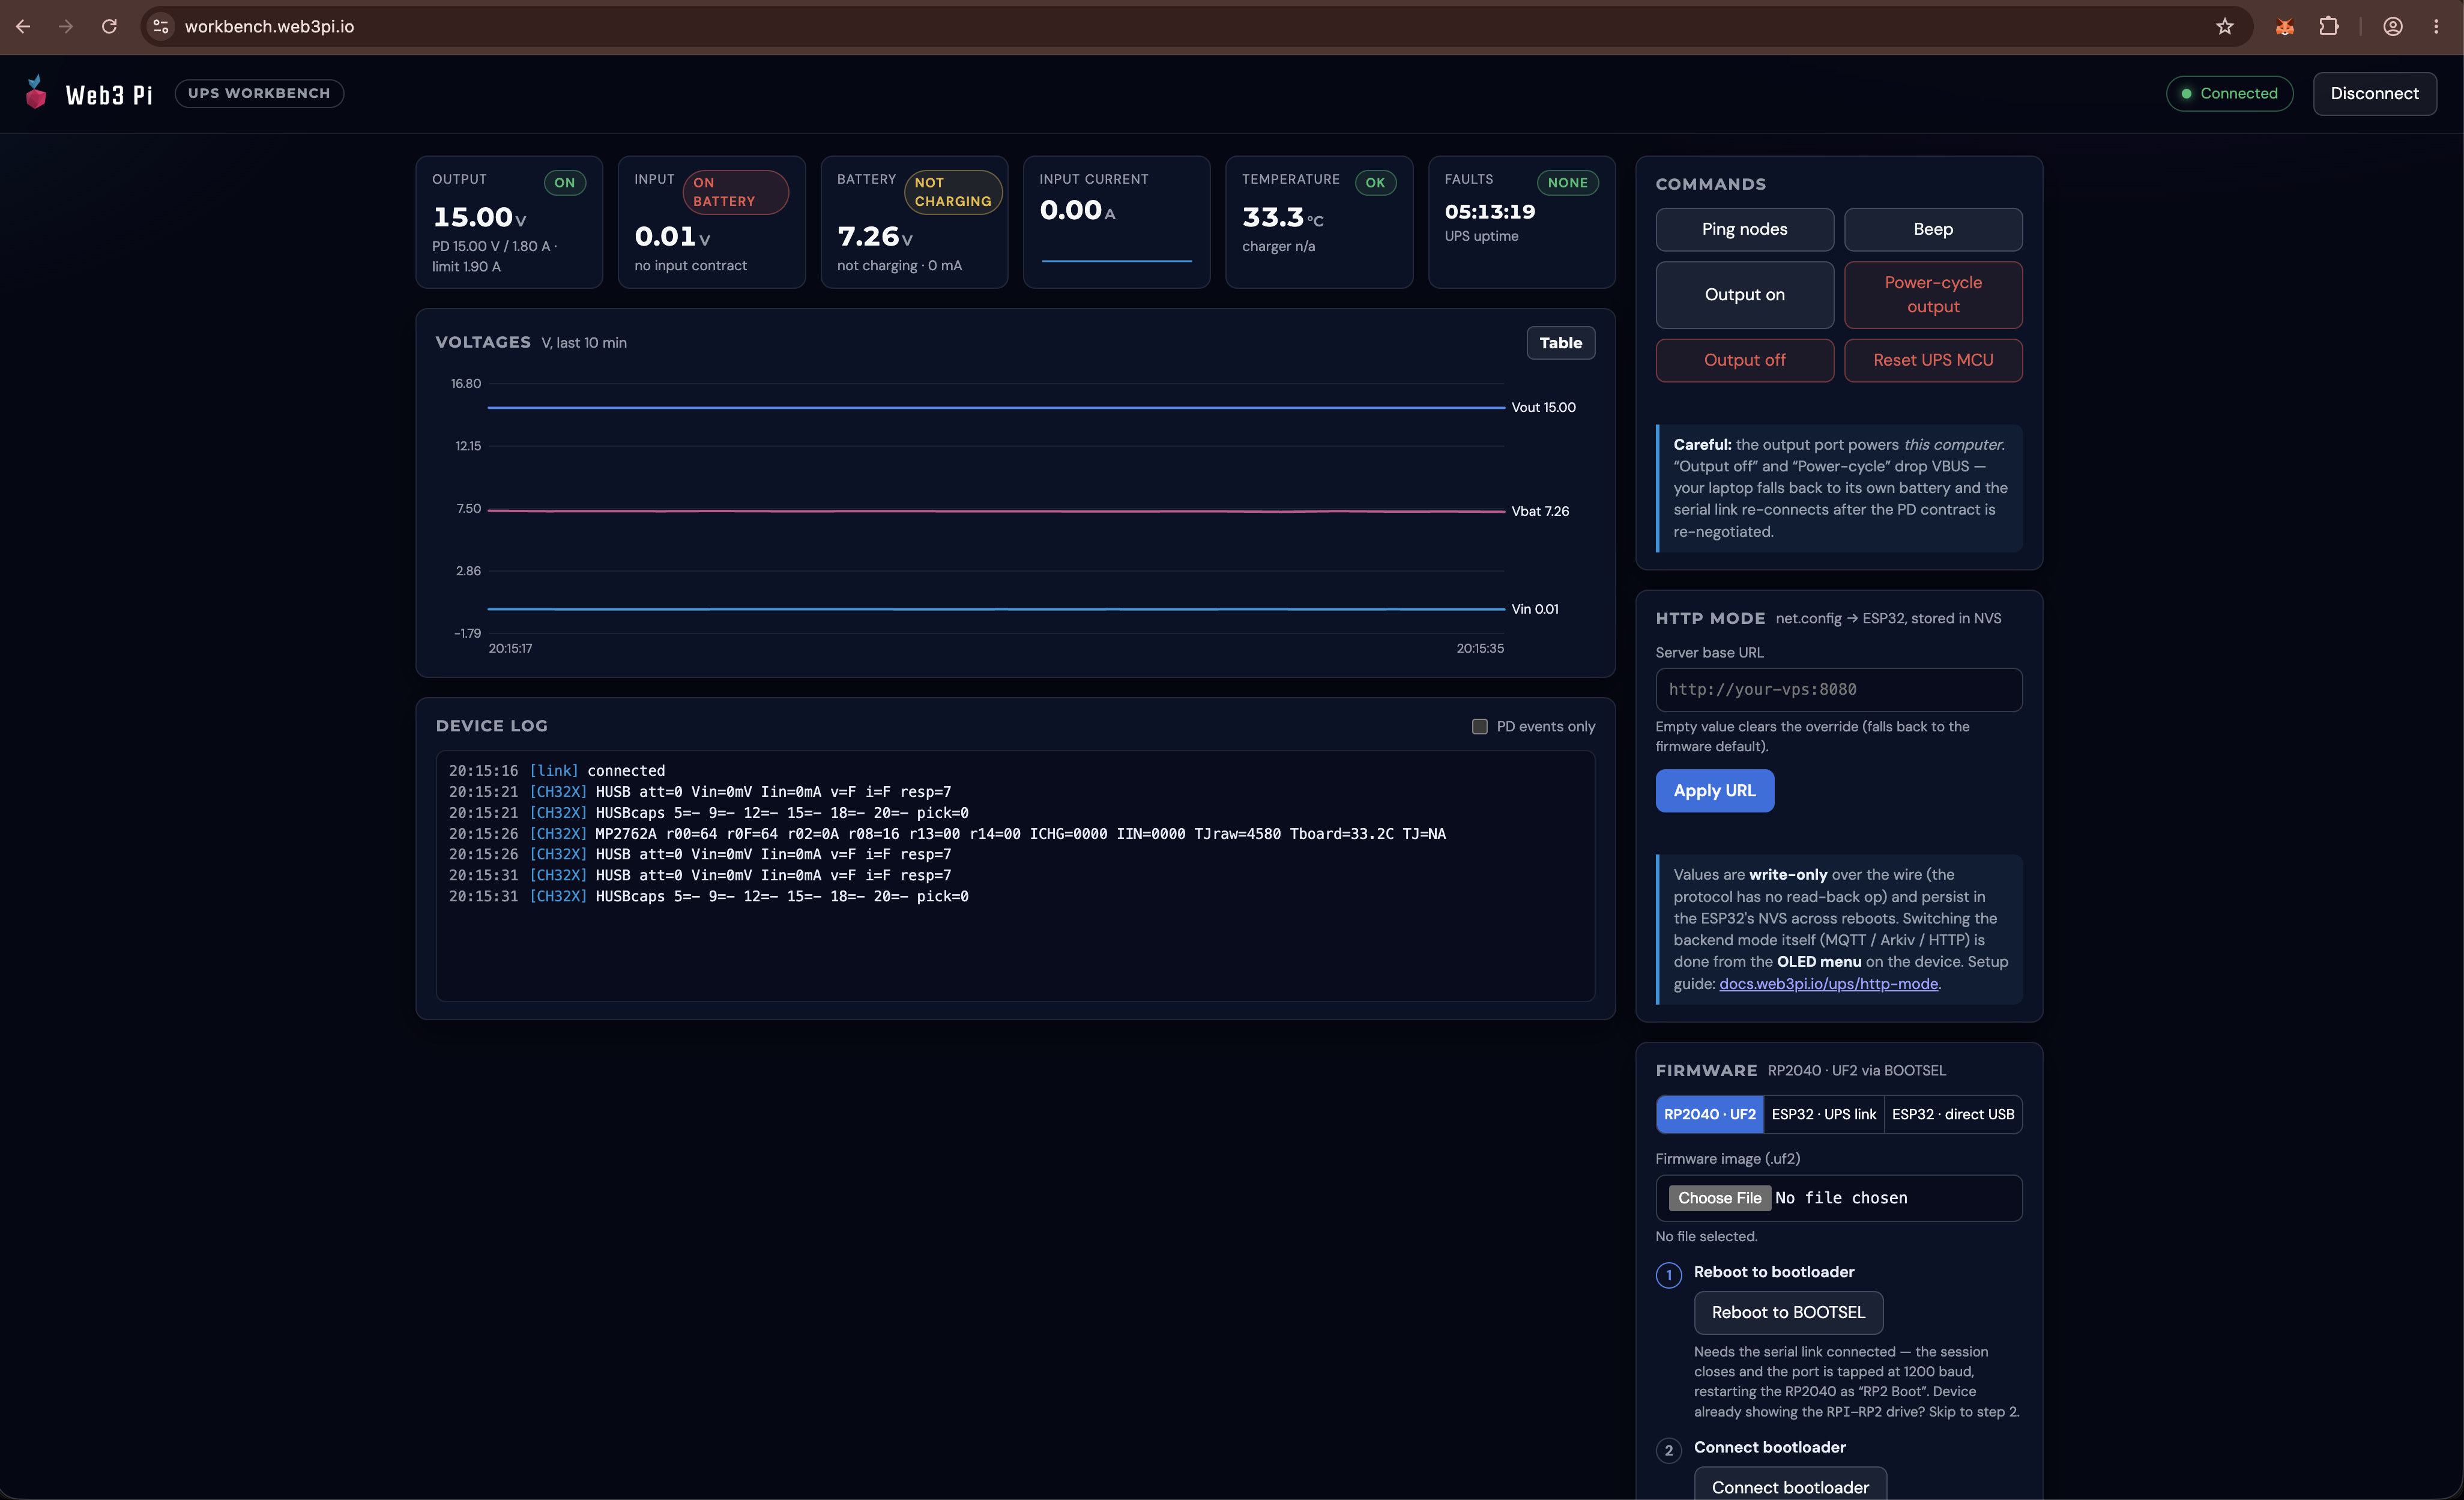
Besides the live dashboard and command buttons, the Device card shows every chip's firmware version, and the Firmware card flashes two targets:
- RP2040 (
.uf2file) — one click reboots the controller into its built-in bootloader, you pick RP2 Boot in the browser prompt, and the page flashes and byte-for-byte verifies the image. The UPS output keeps powering your computer the whole time. - ESP32 (
.binfile) via the UPS link — flashes the modem module through the same cable, no access to the module needed. The transfer takes a few minutes and is rollback-safe, exactly like a panel update.
A third mode — ESP32 · direct USB — talks to the M.2 module's own USB port (under the service flap) and is only needed to recover a module or migrate very old firmware; the page walks you through it.
Never erase the ESP32's flash
The ESP32 carries factory per-device provisioning data. The Workbench never erases it — but if you ever flash with other tools (e.g. esptool.py), do not use erase_flash on a provisioned unit.
Related Pages
- Web Panel — claiming, commands, and the Events tab where update progress lands
- Troubleshooting — what a slow or rolled-back update looks like
- Host Integration — the USB link the Workbench uses