Two-Factor Authentication (2FA) for Cockpit
Adding Two-Factor Authentication (2FA) to Cockpit increases the security of your server by requiring a time-based one-time password (TOTP) in addition to your regular credentials.
The Web3 Pi team developed a plugin to easily enable 2FA in Cockpit using a graphical interface. Alternatively, you can manually configure 2FA using the libpam-google-authenticator package.
Step 1: Install Required Packages
Navigate to the Web3 Pi Updater section in Cockpit and install Two Factor Authentication Plugin for Cockpit:

Alternatively, you can install the plugin manually by opening a terminal and running the following command:
Note
Cockpit will restart after the installation of the plugin, so you may need to refresh the page and log in again.
Step 2: Configure 2FA
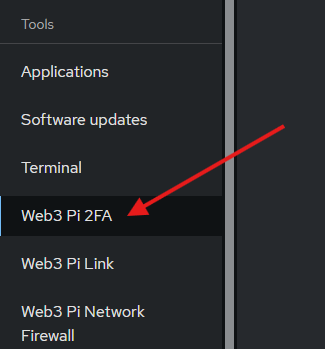
After installing the plugin, navigate to the Web3 Pi 2FA section in Cockpit:
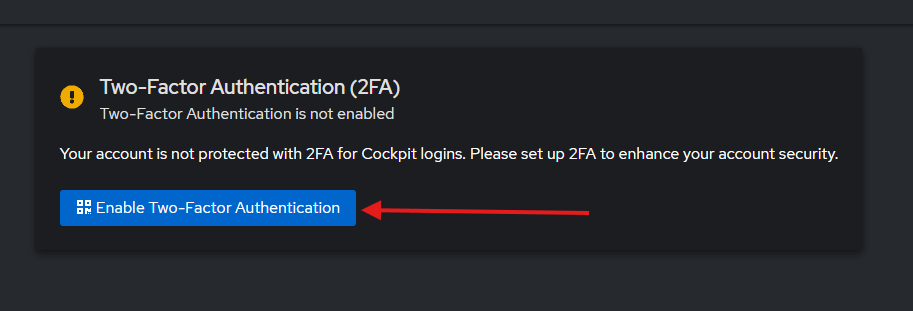
Click Enable Two-Factor Authentication to start the setup process.
Follow the on-screen instructions to set up 2FA:
- Scan the QR code with your preferred authenticator app (e.g., Google Authenticator, Authy).
- Enter the verification code from your authenticator app to complete the setup.
- Save the emergency scratch codes in a safe place.
Note
Scratch codes are one-time use only. If you lose access to your authenticator app, enter one of these codes to log in and recreate your 2FA setup.
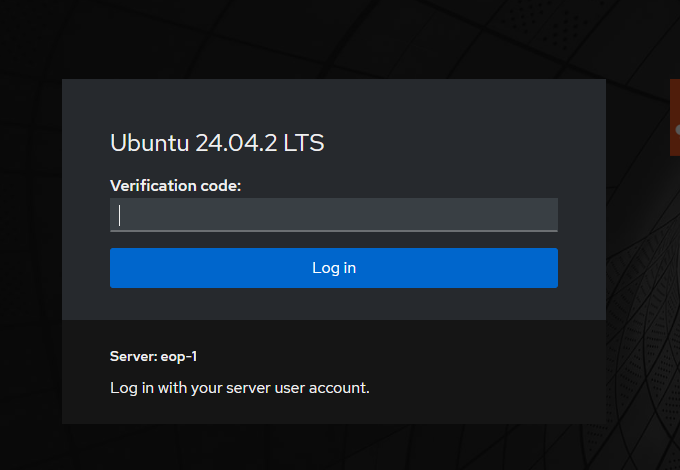
Step 3: Test Your Setup
- Log out of Cockpit.
- Log back in. You should be prompted for a verification code from your authenticator app.
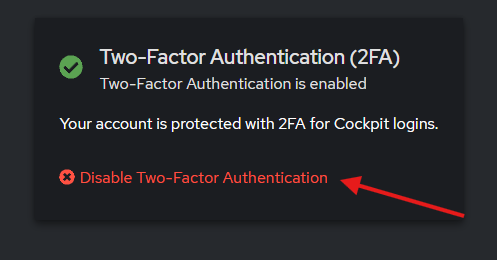
Uninstalling 2FA
To remove 2FA from Cockpit, navigate back to the Web3 Pi 2FA section and click Disable Two-Factor Authentication.
Step 1: Install Required Packages
Open a terminal and run:
This installs the PAM module for Google Authenticator.
Step 2: Configure Google Authenticator for Your User
Run the following command to set up Google Authenticator with recommended options:
Note
-tuse TOTP instead of HOTP (recommended).-ddisable reuse of previously used TOTP tokens.-fdisable confirmation before writing the~/.google_authenticatorfile.-r 3 -R 30limits the number of login attempts to 3 every 30 seconds.-Wby default google-authenticator allows the use of codes that were generated a little before or a little after the current time. This option disables that feature (recommended for security).-Q UTF8specifies the encoding for the QR code. Change to-Q ANSIif you're having issues with viewing the QR code.
- This will generate a secret key, QR code, and emergency scratch codes.
- Scan the QR code with your preferred authenticator app (e.g., Google Authenticator, Authy).
- Enter the verification code from your authenticator app to complete the setup.
- Save the emergency scratch codes in a safe place.
Note
Scratch codes are one-time use only. If you lose access to your authenticator app, enter one of these codes to log in and recreate your 2FA setup.
Step 3: Enable 2FA for Cockpit
Use the following command to add the Google Authenticator PAM module to the Cockpit PAM configuration:
This tells Cockpit to require a TOTP code during login.
Note
- The
nullokoption disables 2FA for users that do not have a~/.google_authenticatorfile.
Step 4: Restart Cockpit
Restart the Cockpit service to apply the changes:
Step 5: Test Your Setup
- Log out of Cockpit.
- Log back in. You should be prompted for a verification code from your authenticator app.
Uninstalling 2FA
To remove 2FA from Cockpit, simply delete the line you added to the PAM configuration:
Then restart the Cockpit service:
You can also remove the generated ~/.google_authenticator file and the installed packages if you no longer need 2FA: